How can I use ephemeral drives with SQL Server tempdb?
First of all, if you are not familiar with ephemeral storage, then check out our previous post on the topic.
SQL Server loves to use tempdb and believe it or not it’s not relegated solely to the types of queries you might think, such as ordering and grouping. It’s used by a whole world of straight forward read-only queries as well making tempdb a potential bottleneck for even you most simple of uses.
In a virtualized environment, especially with many of the industry leaders in cloud IaaS, you’ll have an ephemeral drive available. Simply put; this is a local (typically SSD) disk that can be used for temporary storage and is routinely “re-formatted” when your server either reboots or is power cycled.
Its speed makes it a very compelling option for SQL Server tempdb files and with a few pointers – it’s actually quite a viable and well performing option:
Create the folder for tempdb:
When freshly installing SQL Server, you’ll want to point the tempdb files at this ephemeral drive. Be sure to put the tempdb files into a folder structure. Something basic like “X:\SQLData” works quite well.
When the ephemeral drive is wiped (before each system startup) the folder structure will quite obviously be lost and SQL Server won’t re-create this folder for you – but please don’t take the bait and just use the root of the drive for tempdb files. If you do, your SQL Server installation will almost definitely fail.
Set permissions on the new folder:
Install SQL Server:
Recreate the folder structure at startup:
This is where the magic happens. In order for SQL Server to start successfully, we’ll want to ensure that the folder structure is re-created at system startup and that the security is replaced so that the SLQ Server service account can read, write and create in this folder. We’ll do that with local Group Policy, but don’t worry – it’s pretty straight forward.
Launch the Local Group Policy editor by clicking Start and typing gpedit.msc in the Start Search box, and then pressing ENTER.
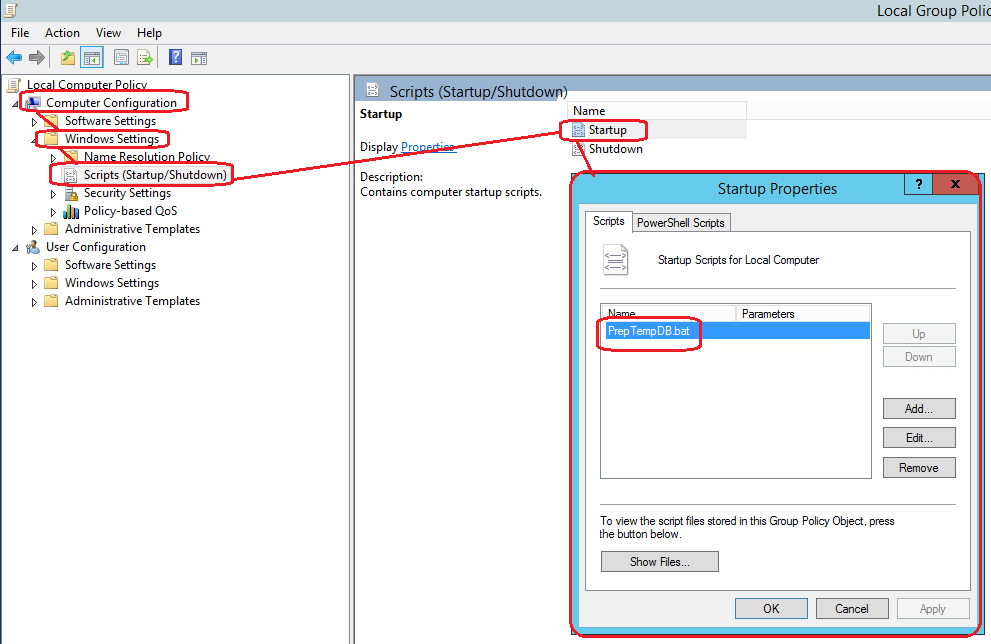
Next you’ll want to navigate to Local Computer Policy -> Computer Configuration -> Windows Settings -> Scripts (Startup/Shutdown)
Now you’ll want to double-click the “Startup” item on the right-hand side of the group policy editor to add the startup script.
Click “Show Files”.
Now you should be faced with a windows explorer window that points to “C:\Windows\System32\GroupPolicy\Machine\Scripts\Startup”.
Here we will create a new batch file which contains the following text:
MD X:\SQLData
icacls ” X:\SQLData” /grant Domain\Username:(OI)(CI)F
Be sure to change “X:\SQLData” to your actual ephemeral drive folder structure and also change “Domain\Username” to the service account that you are using to run SQL Server.
In case you are wondering, OI is the acronym for “object inherit” and “CI” is for container inherit. “F” gives the specified account full access to the folder and its children.
For more information on these parameters, see the Microsoft Technet article at https://technet.microsoft.com/en-us/library/Cc753525.aspx
Now, click the “Add” button and select the batch file that we created in the previous step.
You’ll need no parameters so just leave this field blank and click “OK” and then “OK” again to save your new startup script.
Finally, restart your new server and test that the script ran as expected and that SQL Server started successfully.